So, you have a design. You have tools. You have motivation (can I borrow some of that?). You're ready to buy some wood and start building.....but wait.....not so fast. The cut list might be one of the most important parts of any project. Without one, you don't know exactly how much material you're going to need. Knowing how much material to buy can save you a ton of money in the form of fuel, and time spent running back to the lumber yard/home improvement store.
First, you need to know the individual measurements for each piece in your project.
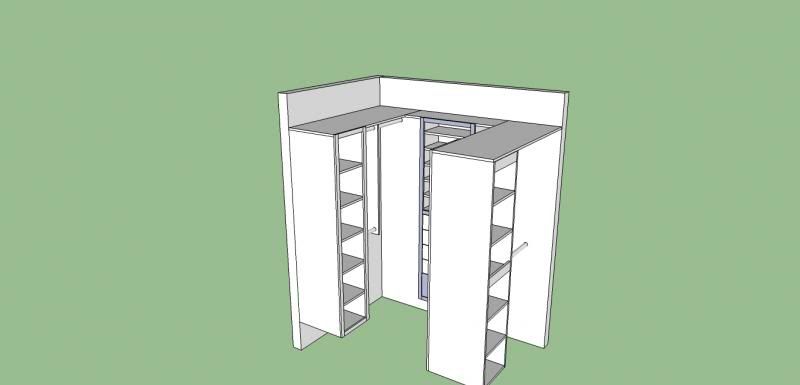
My cabinets are going to be made of 3/4" birch plywood with 1x2 maple faces. Keep in mind that dimensional lumber measurements do not actually correspond with their actual measurements. Usually, this means you need to subtract 1/2" from each measurement (except on 1" widths) to get the actual size. This means that a piece of 1x2 lumber is actually 3/4"x1-1/2". A 2x4 (commonly used for framing walls, is actually 1-1/2"x3-1/2". Confusing....I know. My cabinet faces are all going to be 72" tall. I wanted the top closet shelf that extends from front to rear of the closet to also act as the top of each of my side cabinets. Since my material is 3/4" birch plywood, I subtracted 3/4" from my overall cabinet height, so that the face frames will cover the edge of those top shelves. This means that while my cabinet faces will indeed be 72" tall, the sides of the cabinets will only be 71-1/4" tall. I did the same thing with the shelf that runs across the top of the back cabinet. If you look at the design picture below, I think you'll see what I'm talking about:
So this means my front cabinet sides are going to be (I'm going to switch to decimals here instead of fractions....hope you can follow along) 71.25" tall by 19.25" deep. The bottoms of the cabinets are 14.5" wide by 19.25" deep and the five shelves per cabinet are going to be 14.375" wide by 19.125 deep. I cut these 1/8" smaller on the width and depth because the shelves will be adjustable and cannot fit tight to the insides of the cabinets. There are also two cleats per cabinet (in the back) used to fasten them to the wall. These cleats are 3"x14.5".
My rear cabinet is 22" wide and 12" deep, overall. remember that the 3/4" thickness of the cabinet faces are part of this overall measurement so my sides are going to be 71.25" tall by 11.25 deep. The bottom and center shelf for this cabinet are both fixed, and therefore will be 20.5" wide by 11.25" deep. The five adjustable shelves up top will be 20.375" wide by 11.125" deep. This cabinet also uses two cleats at the rear to fasten it to the wall of the closet. These cleats are 3" wide by 20.5" long.
The two front to back top shelves will be 52" long by 19.25" deep while the center top shelf above the back cabinet will be 36.5" wide by 11.25" deep.
The front cabinet faces are made using 1x2 maple. I need two pieces 72" long (styles) and two more pieces 13" long (rails). You need two sets of styles and rails, one for each cabinet. The rear cabinet has a center rail that covers the front of the center shelf, so you need two styles 72" long, and three rails 19" long.
Knowing those measurements, we can write down each set, and the quantity of each. This is our cut list.
Once you know your cut list, you need to know how to lay the pieces out on your material to make the best use of space and reduce waste. If you're good with math and can envision shapes and measurements easily, you can probably jot everything down on a piece of paper. You can also draw out your measurements on some graph paper and see how everything will fit on a single piece of material. One of the easiest ways to make a layout sheet is with one of many free programs designed to do just that. I did a quick Google search and stumbled upon a free program called MaxCut that looked like it would do exactly what I needed. Now...there are ways to accomplish this using SketchUp (the program I used for designing the closet, and mentioned in Part 1 of this series), but it's a bit more complicated. Until you're really familiar with SketchUp and how to make components, using a stand alone program like MaxCut is a bit easier.
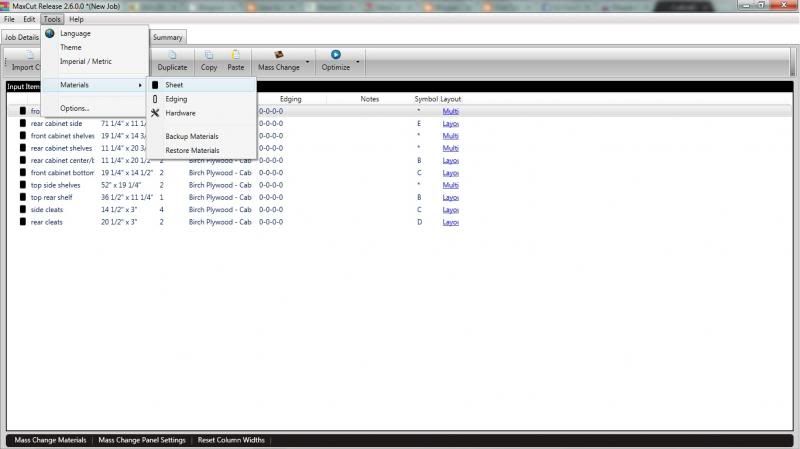
After downloading MaxCut, you will be asked a few set-up questions involving your preferred language, measurement system and blade kerf (thickness). Once setup completes, you can get to work. Since the material I'm using for this project doesn't yet exist in the program, I have to create a new material. Click the Tools menu, Materials, then click Sheet.
Now you need to click the "Add New Sheet" button, and enter the details for your material in the pop up window. As you can see, I labeled my sheet as Birch Plywood - Cabinet Grade, and entered my measurements as 48" wide by 96" long by 3/4" thick. There is also a section where you can add price information, which while not necessary, can help you figure out your total material cost for the project.

Click on the File menu and Open to start a new job. Name the job, then click on the "Input Items" tab and click the "Add" button. In the pop up window, enter the name of your panel, the measurements for your panel, desired quantity and the "Panel Material" you wish to use for this panel. Below I have named my panel "front cabinet side" and have given it a length of 71.25" and a width of 19.25". I set my quantity at four, and chose Birch Plywood as my material. Once you enter the information for the panel, click the save button. You'll need to do this for each panel in your project.

I've only entered the panels for my plywood parts, as I didn't really feel the need to add my face frame parts to the layout, but if you wish, you can do so....just remember to add the type of material to the program so you can select it while adding the panel. Now that I have my entire list and quantities added to the program it looks like this:

Now, if we click the "Optimized Sheets" tab, it will create a layout of our panels on a sheet of the chosen material....in this case my 4'x8' sheet of 3/4" plywood. It will also tell me how many sheets I need, given the chosen cut settings:

If you click the "Cut Settings" button, you can choose how the program will optimize your layout. You can basically tell it whether or not you want your first cut to cut across the width of your sheet, the length of the sheet, or by choosing "Normal" it will try to reduce waste by combining rip and crosscuts. This method is the most efficient use of material, but can potentially leave you with some strange cuts. In my case, it worked out just fine. The layout shows that I need four sheets of plywood for the closet, and by clicking the "next" button I can see each sheet's layout.
Now....hopefully you have a good idea of what a cut sheet and layout are, and how to use them to benefit your project. I know I've said it before.....but next post we'll actually get to work and start cutting material. Leave any questions or comments below, and I'll do my best to answer them.
No comments:
Post a Comment