Our closet is 75" wide, by 52" deep with double closet rods on the right side, and a single pole on the left. There is a short shelf that runs above each set of closet poles, close to the ceiling. The closet also has an inward opening 24" entry door (exactly like all of the bedroom/bathroom doors in the house). Most closets will have a bi-fold door, or an outward opening door. This keeps the door from interfering with the available space inside the closet. Unfortunately, one of the problems with our closet, is that you had to walk inside, then close the door behind you in order to access anything on the right hand side of the closet. This meant I would have to find another solution for the door.
I've never been a huge fan of bi-fold doors. They tend to sag over time, and if your opening isn't perfect, they just never look right to begin with. Some might say they look cheap. But....when you're trying to utilize every bit of space you can in a closet, the bi-fold is a pretty simple solution. Since our door was only 24" wide, replacing it with a 24" bi-fold would mean that when the door was opened, the folded door would take up about two inches of space inside the door frame and stick straight out. With limited space in the bedroom, this means entry to the closet could be awkward. What I decided to do instead, was buy a 24" bi-fold door, and remove the hinges in the center. I would then carve out hinge pockets into the outsides of the two halves so I could hang them on the existing door frame (but opening outward instead of inward). This will allow me to open two tiny 12" doors which will swing fully open, taking up very little space on the wall, and allow full use of the 24" opening........but we'll get back to the door project later. We have cabinets to design and build.
First thing I did was use a ruler and pencil to sketch up a quick overhead layout of the closet, being careful to scale down my measurements as accurately as possible. My drawing took up most of an 8.5x11" piece of printer paper. I then just sorta drew in some boxes where I thought the cabinets might fit. I figured out how wide I thought the cabinets could be, and decided this plan was going to work.....what I decided to do was place two cabinets against the front wall of the closet so when you walked into the door, you'd have the open fronts of both cabinets facing your right and left sides. Then I wanted to put another cabinet on the back wall facing you as you walked in. Since I had about 25.5" between the closet door opening and each side wall, I figured I should make the cabinets 24" deep to utilize as much space as possible. Since I've only got 52" of closet depth, I needed to make the cabinets as narrow as possible (while still being functional) so I could maximize the amount of closet rod length between the cabinets and the back wall. 16" seemed like it would be a good fit.
Our closet rods (like many houses) were spaced about 12" from the wall, so assuming I left an equal 12" on both sides of the rod (that's 24" total from the wall for those of you playing along at home), I should have about 27" of usable space between the two sides at the back wall. I wanted to build a cabinet on the back wall that was 25" wide by 16" deep. I planned on making all cabinets 84" tall from floor to ceiling. I wanted to keep the right side of the closet as a double rod setup. On the left side, instead of the single rod, I wanted to use half of the space with a double rod setup, but leave the other half as a single rod so there would still be some space for hanging long items. I figured a divider wall that ran between the closet rods could make this work just fine.
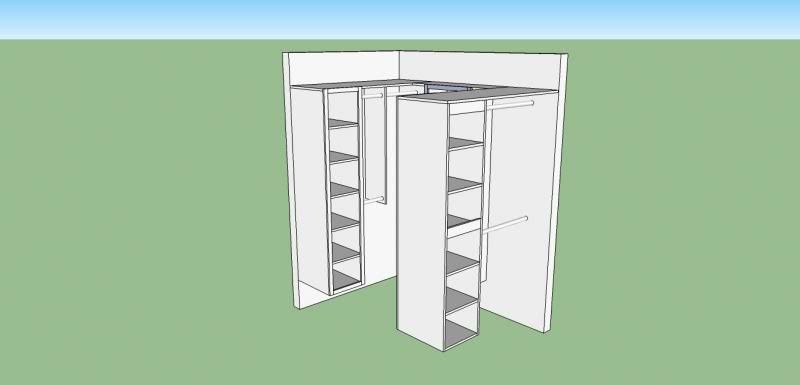
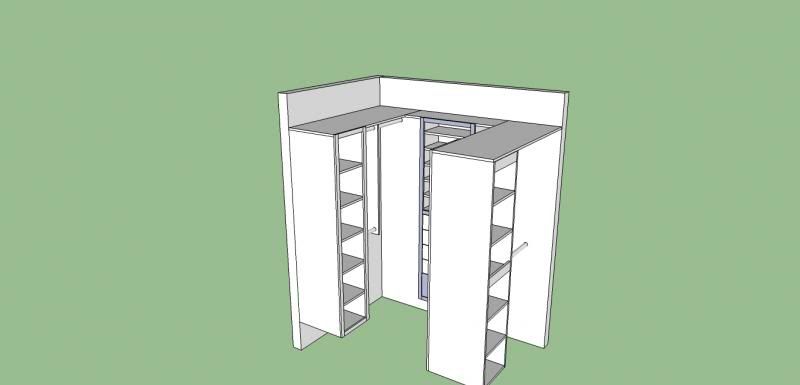
While at work the next day, I bounced my ideas off a friend of mine who used to run a finish carpentry side business. He's done a decent amount of cabinet work in the past, and has a good imagination when it comes to stuff like this. While he liked my ideas, he pointed out that even though I would be using up what might be considered wasted space with my full depth cabinets, it would make the closet seem very cramped. So after deciding he was right, I wanted to see what all of this would look like in 3D. I did some searching on the internet and found a program called Sketchup which allows you to make really nice 3D designs, much like expensive CAD programs, but this has more limited features, and the trial version is free to use for non-commercial purposes. I downloaded the program and watched a ton of tutorial videos on YouTube. Eventually I started to get the hang of it, and this is what I came up with:
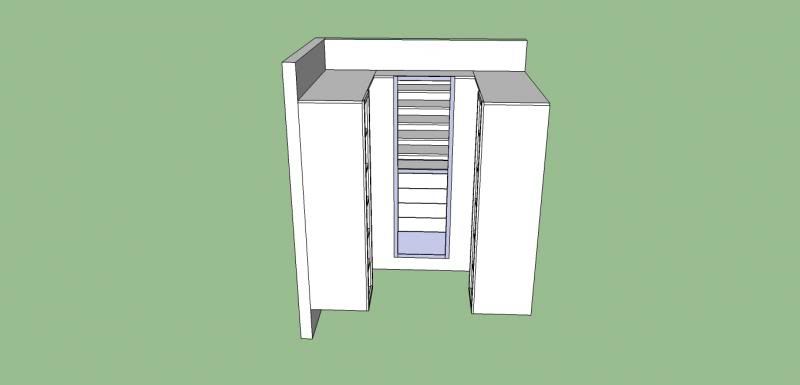
This program is really awesome! I know you're probably thinking, "But Gib.....I can't do that!".....sure you can. I did this after just a few hours of playing with the program, and I had no prior experience. The cool thing about this program, is I can grab and spin the entire drawing around so I can see it from any angle.
So, in this drawing, the side cabinets have been reduced to 20" depth, and the back cabinet is now 22" wide by 12" deep. This allowed me to open up the space inside the closet a bit without really losing any usable shelving space. You might also notice that the cabinets are now do not touch the floor. My friend Shannon suggested that....it allows me to use the small space under the cabinet on the floor for any abnormally long items, and it's just aesthetically pleasing. You can see the short divider wall on the back side of the closet which separates the double rod from the single rod. The cabinets are now 72" tall instead of 84", and all of the shelving in the front side cabinets is adjustable using shelf pin holes (much like you see on the cheap particle board closet kits you can buy at the big box stores). The back cabinet has a fixed shelf in the middle with adjustable shelving above and drawers below. Full width shelves will go around the top of all three cabinets. You'll also notice that the cabinets have a nice face frame on the front. Not only does it look better that way, but the frames will give added support to the plywood boxes.
One of the cool things about this setup, is that we're adding in a bunch of stuff that takes up space inside the closet, but believe it or not, we're actually going to gain usable space. Right now, Melissa's jeans are folded into a stack that sits on a milk crate on the floor. The rest of the floor is lined with shoes and boots. We currently have a total of 156" of closet rod....but much of that is used for clothing that would be better suited for folding up on the shelf. Once the cabinets are in, we'll lose 30" of closet rod.....BUT we'll also be gaining almost 33 square feet of shelf space and 4 cubic feet of drawer space!! Needless to say.....I'm pretty excited about it.
Next update.......we get down to business and make some sawdust fly.
If the space is available pocket doors are great
ReplyDeleteWhile I agree that a pocket door would probably be the best solution for our closet (as well as the bathroom), I didn't feel like tearing down any of the walls to install one. The re-worked bi-fold door should do nicely....as I sit and wonder why the guy who rebuilt this house didn't install pocket doors to begin with....
ReplyDelete